社区日报 第1388期 (2022-05-08)
https://mincong.io/cn/prevent- ... arch/
2. 完美避坑!记一次Elasticsearch集群迁移架构实战
https://zhuanlan.zhihu.com/p/427992639
3. Elasticsearch常见的5个错误及解决策略
https://blog.51cto.com/u_14886891/5246763
编辑:cyberdak
归档:https://ela.st/cn-daily-all
订阅:https://ela.st/cn-daily-sub
沙龙:https://ela.st/cn-meetup
B站:https://ela.st/bilibili
收起阅读 »
社区日报 第1387期 (2021-05-07)
https://cloud.ofweek.com/news/ ... .html
2. Elasticsearch整库迁移到云搜索服务
https://support.huaweicloud.co ... .html
3. Netflix工作室使用Elasticsearch和ApacheFlink索引并搜索GraphQL中的数据
https://www.infoq.com/news/202 ... arch/
编辑:陶希阳
归档:https://ela.st/cn-daily-all
订阅:https://ela.st/cn-daily-sub
沙龙:https://ela.st/cn-meetup
https://cloud.ofweek.com/news/ ... .html
2. Elasticsearch整库迁移到云搜索服务
https://support.huaweicloud.co ... .html
3. Netflix工作室使用Elasticsearch和ApacheFlink索引并搜索GraphQL中的数据
https://www.infoq.com/news/202 ... arch/
编辑:陶希阳
归档:https://ela.st/cn-daily-all
订阅:https://ela.st/cn-daily-sub
沙龙:https://ela.st/cn-meetup 收起阅读 »
社区日报 第1386期 (2022-05-06)
https://www.elastic.co/cn/blog ... 8-2-0
2.基于MiniKube 部署ELK日志采集平台
https://dev.to/sagary2j/elk-st ... -16cl
3.开源数据库十年发展走势,Elastic依然强悍!
https://ossinsight.io/database ... years
编辑:铭毅天下
归档:https://ela.st/cn-daily-all
订阅:https://ela.st/cn-daily-sub
沙龙:https://ela.st/cn-meetup
https://www.elastic.co/cn/blog ... 8-2-0
2.基于MiniKube 部署ELK日志采集平台
https://dev.to/sagary2j/elk-st ... -16cl
3.开源数据库十年发展走势,Elastic依然强悍!
https://ossinsight.io/database ... years
编辑:铭毅天下
归档:https://ela.st/cn-daily-all
订阅:https://ela.st/cn-daily-sub
沙龙:https://ela.st/cn-meetup 收起阅读 »
Enterprise:使用 Elastic Stack 8.2 中的 Elasticsearch API 来定位 App Search 中的文档
使用 Elastic 8.2 版打造流畅的搜索驱动型客户体验
有了 Elastic 8.2 版,我们的客户和社区将能够更快地打造流畅的搜索体验。从“低代码”到“完全控制”,Elastic 8.2 版为用户提供了更大的灵活性,让他们可以用自己喜欢的方法来构建搜索驱动型解决方案。
此外,Elastic 8.2 版通过基于尾部的采样进一步扩展了对高度分布式、大容量云原生服务的可见性,再加上带有背景信息的告警、精简的主机检查、新的调查指南以及威胁情报解决方案的全面上线,安全分析师的体验也有了大幅提升。
通过采用全新的随机采样器聚合、对 Elasticsearch 矢量搜索功能进行多项改进,以及在 Kibana 中正式推出 Discover 的新数据探索工具,无论用户选择如何使用自己的数据,升级到 Elastic 8.2 版的用户都可以更快地获得搜索结果和见解。无论是将人员和团队与重要内容关联起来、优化任务关键型应用程序和基础架构,还是保护数字生态系统免受网络威胁,全新上线的 Elastic 8.2 版都可以帮助每个人成功迈上新的台阶。
更多阅读请参阅 https://elasticstack.blog.csdn ... 81433
有了 Elastic 8.2 版,我们的客户和社区将能够更快地打造流畅的搜索体验。从“低代码”到“完全控制”,Elastic 8.2 版为用户提供了更大的灵活性,让他们可以用自己喜欢的方法来构建搜索驱动型解决方案。
此外,Elastic 8.2 版通过基于尾部的采样进一步扩展了对高度分布式、大容量云原生服务的可见性,再加上带有背景信息的告警、精简的主机检查、新的调查指南以及威胁情报解决方案的全面上线,安全分析师的体验也有了大幅提升。
通过采用全新的随机采样器聚合、对 Elasticsearch 矢量搜索功能进行多项改进,以及在 Kibana 中正式推出 Discover 的新数据探索工具,无论用户选择如何使用自己的数据,升级到 Elastic 8.2 版的用户都可以更快地获得搜索结果和见解。无论是将人员和团队与重要内容关联起来、优化任务关键型应用程序和基础架构,还是保护数字生态系统免受网络威胁,全新上线的 Elastic 8.2 版都可以帮助每个人成功迈上新的台阶。
更多阅读请参阅 https://elasticstack.blog.csdn ... 81433 收起阅读 »
社区日报 第1385期 (2022-04-28)
http://niyanchun.com/filebeat-source-learning.html
2.干货 | Elasticsearch 数据建模指南
https://mp.weixin.qq.com/s/vSh6w3eL_oQvU1mxnxsArA
3.Observability:如何使用 Elastic APM 来监控多语言微服务应用程序
https://elasticstack.blog.csdn ... 24401
编辑:Se7en
归档:https://ela.st/cn-daily-all
订阅:https://ela.st/cn-daily-sub
沙龙:https://ela.st/cn-meetup
收起阅读 »
社区日报 第1384期 (2022-04-27)
https://opster.com/guides/elas ... ield/
2. Elasticsearch跨集群数据备份和迁移
https://blog.51cto.com/liqingbiao/2539669
3. 我的es优化之路(需要梯子)
https://medium.com/starbugs/%2 ... 5673c
编辑:kin122
归档:https://ela.st/cn-daily-all
订阅:https://ela.st/cn-daily-sub
沙龙:https://ela.st/cn-meetup
https://opster.com/guides/elas ... ield/
2. Elasticsearch跨集群数据备份和迁移
https://blog.51cto.com/liqingbiao/2539669
3. 我的es优化之路(需要梯子)
https://medium.com/starbugs/%2 ... 5673c
编辑:kin122
归档:https://ela.st/cn-daily-all
订阅:https://ela.st/cn-daily-sub
沙龙:https://ela.st/cn-meetup 收起阅读 »
社区日报 第1383期 (2022-04-26)
1. 把Kafka和ES连在一起,我来我也行(需要梯子)
https://mukherjee-soumya.mediu ... d966b
2. 我们把ES升到7了,简直鹅妹子嘤(需要梯子)
https://medium.com/tokopedia-e ... 9f50d
3. 阿里云的logstash是怎么把关系型数据库同步进ES的(需要梯子)
https://alibaba-cloud.medium.c ... 55b78
编辑:斯蒂文
归档:https://ela.st/cn-daily-all
订阅:https://ela.st/cn-daily-sub
沙龙:https://ela.st/cn-meetup
1. 把Kafka和ES连在一起,我来我也行(需要梯子)
https://mukherjee-soumya.mediu ... d966b
2. 我们把ES升到7了,简直鹅妹子嘤(需要梯子)
https://medium.com/tokopedia-e ... 9f50d
3. 阿里云的logstash是怎么把关系型数据库同步进ES的(需要梯子)
https://alibaba-cloud.medium.c ... 55b78
编辑:斯蒂文
归档:https://ela.st/cn-daily-all
订阅:https://ela.st/cn-daily-sub
沙龙:https://ela.st/cn-meetup 收起阅读 »
社区日报 第1382期 (2022-04-25)
1. Elasticsearch 分布式存储架构与索引原理分析
https://www.cnblogs.com/sgh1023/p/15691061.html
2. Elasticsearch 架构分析
https://zhuanlan.zhihu.com/p/334348919
3. Elasticsearch 架构总览 (需要梯子)
http://solutionhacker.com/elas ... view/
编辑:yuebancanghai
归档:https://ela.st/cn-daily-all
订阅:https://ela.st/cn-daily-sub
沙龙:https://ela.st/cn-meetup
1. Elasticsearch 分布式存储架构与索引原理分析
https://www.cnblogs.com/sgh1023/p/15691061.html
2. Elasticsearch 架构分析
https://zhuanlan.zhihu.com/p/334348919
3. Elasticsearch 架构总览 (需要梯子)
http://solutionhacker.com/elas ... view/
编辑:yuebancanghai
归档:https://ela.st/cn-daily-all
订阅:https://ela.st/cn-daily-sub
沙龙:https://ela.st/cn-meetup 收起阅读 »
社区日报 第1381期 (2022-04-24)
https://blog.csdn.net/imjcoder ... 16978
2. ElasticSearch的评分机制详解
https://blog.csdn.net/qq_29860 ... 74595
3. Elasticsearch 去重cardinality算法之优化内存开销以及HLL算法
https://blog.csdn.net/wuzhiwei ... 76156
编辑:cyberdak
归档:https://ela.st/cn-daily-all
订阅:https://ela.st/cn-daily-sub
沙龙:https://ela.st/cn-meetup
https://blog.csdn.net/imjcoder ... 16978
2. ElasticSearch的评分机制详解
https://blog.csdn.net/qq_29860 ... 74595
3. Elasticsearch 去重cardinality算法之优化内存开销以及HLL算法
https://blog.csdn.net/wuzhiwei ... 76156
编辑:cyberdak
归档:https://ela.st/cn-daily-all
订阅:https://ela.st/cn-daily-sub
沙龙:https://ela.st/cn-meetup 收起阅读 »
社区日报 第1381期 (2021-04-23)
https://dbaplus.cn/news-73-4429-1.html
2. 使用Elasticsearch提高wordpress的搜索性能
https://kinsta.com/blog/wordpress-search/
3. 14款最好的Elasticsearch GUI客户端
https://www.slant.co/topics/11 ... ients
编辑:陶希阳
归档:https://ela.st/cn-daily-all
订阅:https://ela.st/cn-daily-sub
沙龙:https://ela.st/cn-meetup
https://dbaplus.cn/news-73-4429-1.html
2. 使用Elasticsearch提高wordpress的搜索性能
https://kinsta.com/blog/wordpress-search/
3. 14款最好的Elasticsearch GUI客户端
https://www.slant.co/topics/11 ... ients
编辑:陶希阳
归档:https://ela.st/cn-daily-all
订阅:https://ela.st/cn-daily-sub
沙龙:https://ela.st/cn-meetup 收起阅读 »
社区日报 第1380期 (2021-04-22)
1、新的Elasticsearch java客户端详解(梯子)
https://docs.google.com/presen ... _2262
2、使用 Elasticsearch 进行跨区域灾难恢复(梯子)
https://thehackernews.com/2022 ... .html
3、Sonic:一个快速、轻量级和无模式的搜索后端
https://github.com/valeriansaliou/sonic
编辑:铭毅天下
归档:https://ela.st/cn-daily-all
订阅:https://ela.st/cn-daily-sub
沙龙:https://ela.st/cn-meetup
1、新的Elasticsearch java客户端详解(梯子)
https://docs.google.com/presen ... _2262
2、使用 Elasticsearch 进行跨区域灾难恢复(梯子)
https://thehackernews.com/2022 ... .html
3、Sonic:一个快速、轻量级和无模式的搜索后端
https://github.com/valeriansaliou/sonic
编辑:铭毅天下
归档:https://ela.st/cn-daily-all
订阅:https://ela.st/cn-daily-sub
沙龙:https://ela.st/cn-meetup 收起阅读 »
在 Kibana 里统一访问来自不同集群的索引
在 Kibana 里统一访问来自不同集群的索引
现在有这么一个需求,客户根据需要将数据按照业务维度划分,将索引分别存放在了不同的三个集群, 将一个大集群拆分成多个小集群有很多好处,比如降低了耦合,带来了集群可用性和稳定性方面的好处,也避免了单个业务的热点访问造成其他业务的影响, 尽管拆分集群是很常见的玩法,但是管理起来不是那么方便了,尤其是在查询的时候,可能要分别访问三套集群各自的 API,甚至要切换三套不同的 Kibana 来访问集群的数据, 那么有没有办法将他们无缝的联合在一起呢?
极限网关!
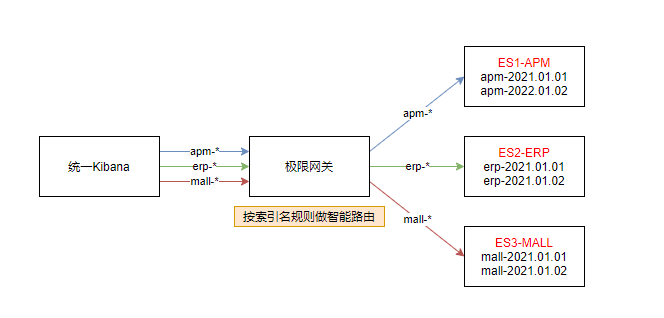
答案自然是有的,通过将 Kibana 访问 Elasticsearch 的地址切换为极限网关的地址,我们可以将请求按照索引来进行智能的路由, 也就是当访问不同的业务索引时会智能的路由到不同的集群,如下图:
上图,我们分别有 3 个不同的索引:
- apm-*
- erp-*
- mall-*
分别对应不同的三套 Elasticsearch 集群:
- ES1-APM
- ES2-ERP
- ES3-MALL
接下来我们来看如何在极限网关里面进行相应的配置来满足这个业务需求。
配置集群信息
首先配置 3 个集群的连接信息。
elasticsearch:
  - name: es1-apm
    enabled: true
    endpoints:
     - http://192.168.3.188:9206
  - name: es2-erp
    enabled: true
    endpoints:
     - http://192.168.3.188:9207
  - name: es3-mall
    enabled: true
    endpoints:
     - http://192.168.3.188:9208
配置服务 Flow
然后,我们定义 3 个 Flow,分别对应用来访问 3 个不同的 Elasticsearch 集群,如下:
flow:
  - name: es1-flow
    filter:
      - elasticsearch:
          elasticsearch: es1-apm
  - name: es2-flow
    filter:
      - elasticsearch:
          elasticsearch: es2-erp
  - name: es3-flow
    filter:
      - elasticsearch:
          elasticsearch: es3-mall
然后再定义一个 flow 用来进行路径的判断和转发,如下:
  - name: default-flow
    filter:
      - switch:
          remove_prefix: false
          path_rules:
            - prefix: apm-
              flow: es1-flow
            - prefix: erp-
              flow: es2-flow
            - prefix: mall-
              flow: es3-flow
      - flow: #default flow
          flows:
            - es1-flow
根据请求路径里面的索引前缀来匹配不同的索引,并转发到不同的 Flow。
配置路由信息
接下来,我们定义路由信息,具体配置如下:
router:
  - name: my_router
    default_flow: default-flow
指向上面定义的默认 flow 来统一请求的处理。
定义服务及关联路由
最后,我们定义一个监听为 8000 端口的服务,用来提供给 Kibana 来进行统一的入口访问,如下:
entry:
  - name: es_entry
    enabled: true
    router: my_router
    max_concurrency: 10000
    network:
      binding: 0.0.0.0:8000
完整配置
最后的完整配置如下:
path.data: data
path.logs: log

entry:
  - name: es_entry
    enabled: true
    router: my_router
    max_concurrency: 10000
    network:
      binding: 0.0.0.0:8000

flow:
  - name: default-flow
    filter:
      - switch:
          remove_prefix: false
          path_rules:
            - prefix: apm-
              flow: es1-flow
            - prefix: erp-
              flow: es2-flow
            - prefix: mall-
              flow: es3-flow
      - flow: #default flow
          flows:
            - es1-flow
  - name: es1-flow
    filter:
      - elasticsearch:
          elasticsearch: es1-apm
  - name: es2-flow
    filter:
      - elasticsearch:
          elasticsearch: es2-erp
  - name: es3-flow
    filter:
      - elasticsearch:
          elasticsearch: es3-mall

router:
  - name: my_router
    default_flow: default-flow

elasticsearch:
  - name: es1-apm
    enabled: true
    endpoints:
     - http://192.168.3.188:9206
  - name: es2-erp
    enabled: true
    endpoints:
     - http://192.168.3.188:9207
  - name: es3-mall
    enabled: true
    endpoints:
     - http://192.168.3.188:9208
启动网关
直接启动网关,如下:
➜  gateway git:(master) ✗ ./bin/gateway -config sample-configs/elasticsearch-route-by-index.yml

   ___   _   _____  __  __    __  _
  / _ \ /_\ /__   \/__\/ / /\ \ \/_\ /\_/\
 / /_\///_\\  / /\/_\  \ \/  \/ //_\\\_ _/
/ /_\\/  _  \/ / //__   \  /\  /  _  \/ \
\____/\_/ \_/\/  \__/    \/  \/\_/ \_/\_/

[GATEWAY] A light-weight, powerful and high-performance elasticsearch gateway.
[GATEWAY] 1.0.0_SNAPSHOT, 2022-04-20 08:23:56, 2023-12-31 10:10:10, 51650a5c3d6aaa436f3c8a8828ea74894c3524b9
[04-21 13:41:21] [INF] [app.go:174] initializing gateway.
[04-21 13:41:21] [INF] [app.go:175] using config: /Users/medcl/go/src/infini.sh/gateway/sample-configs/elasticsearch-route-by-index.yml.
[04-21 13:41:21] [INF] [instance.go:72] workspace: /Users/medcl/go/src/infini.sh/gateway/data/gateway/nodes/c9bpg0ai4h931o4ngs3g
[04-21 13:41:21] [INF] [app.go:283] gateway is up and running now.
[04-21 13:41:21] [INF] [api.go:262] api listen at: http://0.0.0.0:2900
[04-21 13:41:21] [INF] [reverseproxy.go:255] elasticsearch [es1-apm] hosts: [] => [192.168.3.188:9206]
[04-21 13:41:21] [INF] [reverseproxy.go:255] elasticsearch [es2-erp] hosts: [] => [192.168.3.188:9207]
[04-21 13:41:21] [INF] [reverseproxy.go:255] elasticsearch [es3-mall] hosts: [] => [192.168.3.188:9208]
[04-21 13:41:21] [INF] [actions.go:349] elasticsearch [es2-erp] is available
[04-21 13:41:21] [INF] [actions.go:349] elasticsearch [es1-apm] is available
[04-21 13:41:21] [INF] [entry.go:312] entry [es_entry] listen at: http://0.0.0.0:8000
[04-21 13:41:21] [INF] [module.go:116] all modules are started
[04-21 13:41:21] [INF] [actions.go:349] elasticsearch [es3-mall] is available
[04-21 13:41:55] [INF] [reverseproxy.go:255] elasticsearch [es1-apm] hosts: [] => [192.168.3.188:9206]
网关启动成功之后,就可以通过网关的 IP+8000 端口来访问目标 Elasticsearch 集群了。
测试访问
首先通过 API 来访问测试一下,如下:
➜  ~ curl http://localhost:8000/apm-2022/_search -v
*   Trying 127.0.0.1...
* TCP_NODELAY set
* Connected to localhost (127.0.0.1) port 8000 (#0)
> GET /apm-2022/_search HTTP/1.1
> Host: localhost:8000
> User-Agent: curl/7.54.0
> Accept: */*
>
< HTTP/1.1 200 OK
< Date: Thu, 21 Apr 2022 05:45:44 GMT
< content-type: application/json; charset=UTF-8
< Content-Length: 162
< X-elastic-product: Elasticsearch
< X-Backend-Cluster: es1-apm
< X-Backend-Server: 192.168.3.188:9206
< X-Filters: filters->elasticsearch
<
* Connection #0 to host localhost left intact
{"took":142,"timed_out":false,"_shards":{"total":1,"successful":1,"skipped":0,"failed":0},"hits":{"total":{"value":0,"relation":"eq"},"max_score":null,"hits":[]}}%
可以看到 apm-2022 指向了后端的 es1-apm 集群。
继续测试,erp 索引的访问,如下:
➜  ~ curl http://localhost:8000/erp-2022/_search -v
*   Trying 127.0.0.1...
* TCP_NODELAY set
* Connected to localhost (127.0.0.1) port 8000 (#0)
> GET /erp-2022/_search HTTP/1.1
> Host: localhost:8000
> User-Agent: curl/7.54.0
> Accept: */*
>
< HTTP/1.1 200 OK
< Date: Thu, 21 Apr 2022 06:24:46 GMT
< content-type: application/json; charset=UTF-8
< Content-Length: 161
< X-Backend-Cluster: es2-erp
< X-Backend-Server: 192.168.3.188:9207
< X-Filters: filters->switch->filters->elasticsearch->skipped
<
* Connection #0 to host localhost left intact
{"took":12,"timed_out":false,"_shards":{"total":1,"successful":1,"skipped":0,"failed":0},"hits":{"total":{"value":0,"relation":"eq"},"max_score":null,"hits":[]}}%
继续测试,mall 索引的访问,如下:
➜  ~ curl http://localhost:8000/mall-2022/_search -v
*   Trying 127.0.0.1...
* TCP_NODELAY set
* Connected to localhost (127.0.0.1) port 8000 (#0)
> GET /mall-2022/_search HTTP/1.1
> Host: localhost:8000
> User-Agent: curl/7.54.0
> Accept: */*
>
< HTTP/1.1 200 OK
< Date: Thu, 21 Apr 2022 06:25:08 GMT
< content-type: application/json; charset=UTF-8
< Content-Length: 134
< X-Backend-Cluster: es3-mall
< X-Backend-Server: 192.168.3.188:9208
< X-Filters: filters->switch->filters->elasticsearch->skipped
<
* Connection #0 to host localhost left intact
{"took":8,"timed_out":false,"_shards":{"total":5,"successful":5,"skipped":0,"failed":0},"hits":{"total":0,"max_score":null,"hits":[]}}%
完美转发。
修改 Kibana 配置
修改 Kibana 的配置文件: kibana.yml,替换 Elasticsearch 的地址为网关地址(http://192.168.3.200:8000),如下:
elasticsearch.hosts: ["http://192.168.3.200:8000"]重启 Kibana 让配置生效。
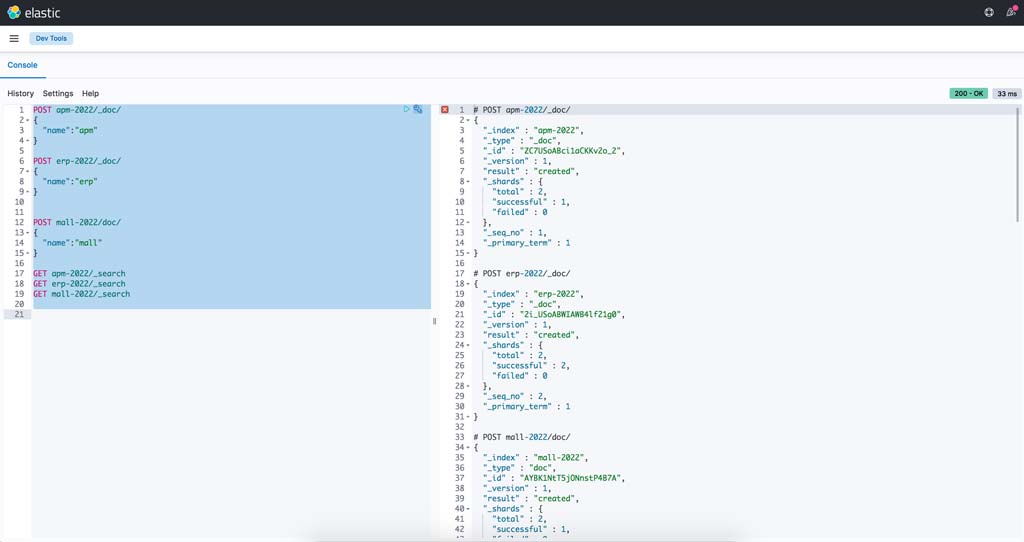
效果如下
可以看到,在一个 Kibana 的开发者工具里面,我们已经可以像操作一个集群一样来同时读写实际上来自三个不同集群的索引数据了。
展望
通过极限网关,我们还可以非常灵活的进行在线请求的流量编辑,动态组合不同集群的操作。
收起阅读 »


